Frame Design Samples & Ideas
I hope this and the other sample pages can inspire you and generate some idea of what is possible with great custom frame design.
Gallery Frame Review Client Framing Projects
Gallery Frame Review Client Framing Projects
Rides the Clouds - JD Challenger
 Rides the Clouds-Details Rides the Clouds-Details
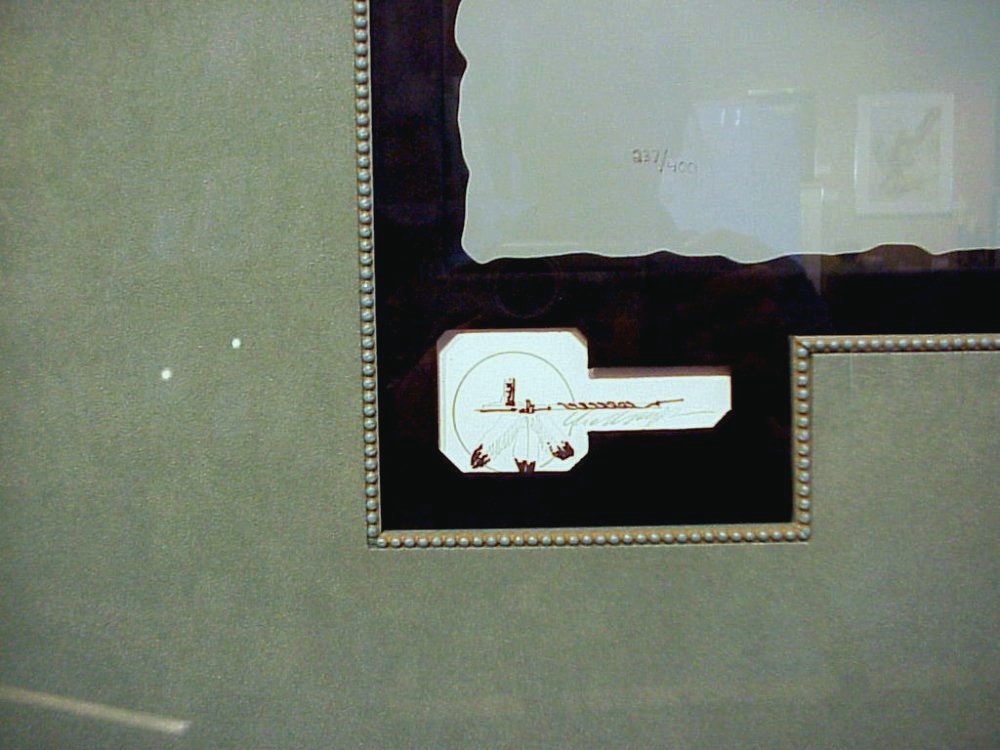
Rides the Clouds
by JD Challenger To the right is a detail from this piece. The artist remarqued this silkscreen with a signed, hand-drawn image. Signed and limited: 237/400. Sold out edition image: 29 x 37-1/4 framed: 50-1/4 x 59-1/2 x 1-1/4 Bottom mat: I created a keyhole cutout around the image, then wrapped the opening and the bottom mat with Black microsuede. Top mat: is a turquoise microsuede Detail: Turquoise beaded fillet. Special cutout for Remarque and drop to allow for the cutout. Mount: oversized rag, hinged. Glazing: Conservation Plexi To purchase Rides the Clouds follow the link. Art will need to be crated and shipped via freight if not purchased withing 50 miles of My Personal Framer, Newberg, OR |
|
"Yule Dog" by Will Bullas
|
This original watercolor was purchased from the artist at a trade show. It came in a bright gold frame, red mat and plexi (Sorry Will, but ouch). The red mat pulled all the attention away from the adorable and very naughty pug. The piece (before reframing) was loaned to another gallery that had Will in for a show, during which he signed the plexi glass. I had to cut a separate opening in the new mats, support the signature on plexi and make the picture more focused on the subject. .
The Design: I used a Nurre Caxton gold that was had minute red splash details, A white hand-wrapped fabric was used for the top mat, the middle mat is gold with a hand-painted bevel of gold, which was them splattered with red paint to match the frame. For the bottom mat I matched the green background with the bevel painted to match the mat color. I cut extra openings to highlight the signature that Will had written on the plexi. The plexi holding the signature was carefully cut and then laid into the mats. The Package: I used all preservation/conservation materials in the mats, backing and the topped it off with Museum Glass. |
|
"Bugs" box
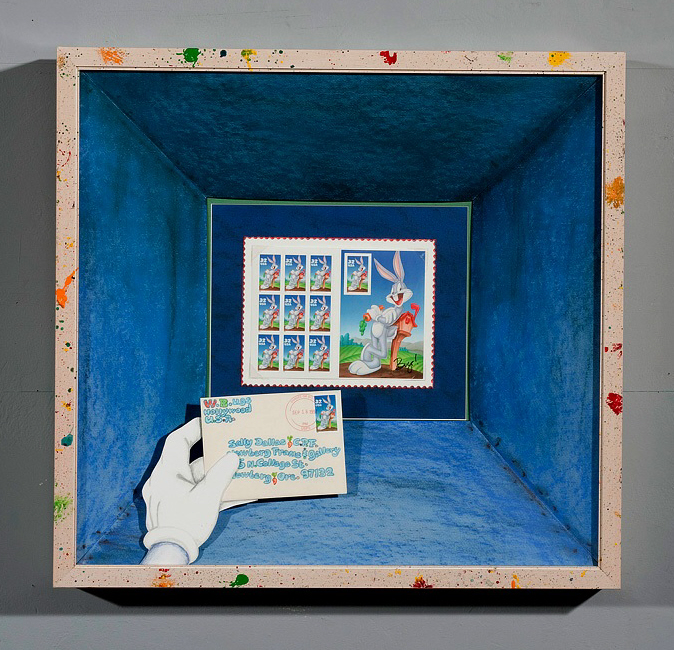
This piece was developed for a competition and went through many design considerations and changes. The focus is a sheet of Bugs Bunny stamps.
"Toons" had a hand in the design & creation.
Concept 1) paint the glass behind the stamp block to extend the background of the large image. Hmmm, when painting glass you move from front to back, i.e. detail to background. For some reason this really stumped me and I decided that my painting skills weren't quite up to this one.
Concept 2) Make it a Mail box!! The frame itself is over 4" deep so it lends itself to the illusion I decided to create. But needed the box to look even deeper. Using a cove mat (sloped sides). Pastels were used create more realistic seams, rivets and shading to enhance the feeling of depth. My helper at the time (Lorraine Hall) drew the cartoon hand and then proceeded to write a letter, place it in the envelope and seal it. She let her inner toon write the address. I took it to the Dundee Post Office where they still had some of the Bugs stamps, bought a stamp and had them hand cancel it.
I still don't know what the letter says.
I used Museum glass (and had a lot of people reaching in because they couldn't see the glass) I painted the off white stained frame by going into my "messy" room and letting the "toons" loose with acrylic paint-which they proceeded to throw all over the frame. The stamps are held in place with small, clear archival corners and all the mats are preservation quality.
|
|
Some of the limitless variations and possibilities of frame design.
One piece to the left was an article used a burl frame and created a faux burl panel, French line (hand-ruled thin lines on the mat) and painted bevels to play up the article and connect to the frame. The Gallery Framing Review pages shows many of these pieces and includes a short description of how they were designed Elements-Beyond Basics for more design techniques such as French line, painted bevels, fabric mats, etc. |
Framed Certificate
My Certified Professional Picture Framer (CPF) certificate
|
Design: I took the PPFA logo and created a layered mat
using the chevron design from the logo Top mat: Cherokee faux suede mat worked over the dimensional mat. Bottom mat: The same faux suede as the top mat Mat decoration: The sculpted mat was created with a second mat. I took the mat drop-outs, which would normally be discarded and adhered them to the main mat. the mat was then wrapped with the suede and worked into the raised detail. A Silver fillet was added between the two suede mats. Frame: Arquati, silver with a blue/black curved panel Glass: Tru-Vue Conservation clear Mount: mounted with rice glue and mulberry paper hinges on rag board and backed with foam core. |

Sally L. Dallas CPF Certificate Frame
|
